This is for those who are new to Web Dynpro programming. Here is an explanation of how to set up a Web Dynpro application using the context and binding the context to User Interface (UI) elements of the application. This is only a basic explanation to help set a foundation for understanding Web Dynpro programming. The 3 basic elements of a Web Dynpro application are windows, views and the context. The window is simply a container for a view. To assign a view to a window expand the views and windows under the section labeled ‘Object Name.’ Double click on a window and then drag and drop the view into the window.

The views hold the visual content (i.e. buttons, tables, headers). Once a view is created and populated with UI elements, the text values of some of these elements can be hard coded (via the UI element’s properties)
Or they can be populated dynamically during runtime. Certain elements can ONLY be populated during runtime, such as a table. The text of a button can be set by entering a string value into the ‘text’ property of the element when in the layout tab of the view, for example ‘Hello World’.
For the element that’s text cannot be hardcoded or the element that’s visibility needs to change during runtime, the context needs to be used. The data that is seen on the screen is not stored within the web browser itself. The Web Dynpro application makes calls to the server to retrieve data to be displayed. This is where the context comes into play. The context is the memory on the server that stores data for the Web Dynpro application. When setup correctly a context can hold tables, structures or single element variables. Here is an example of how to build a context and then make method calls to read or set the context.
Select the ‘Context’ tab. Right click on the context node and select ‘Create’ -> ‘Node’ and fill out the fields according to the picture below.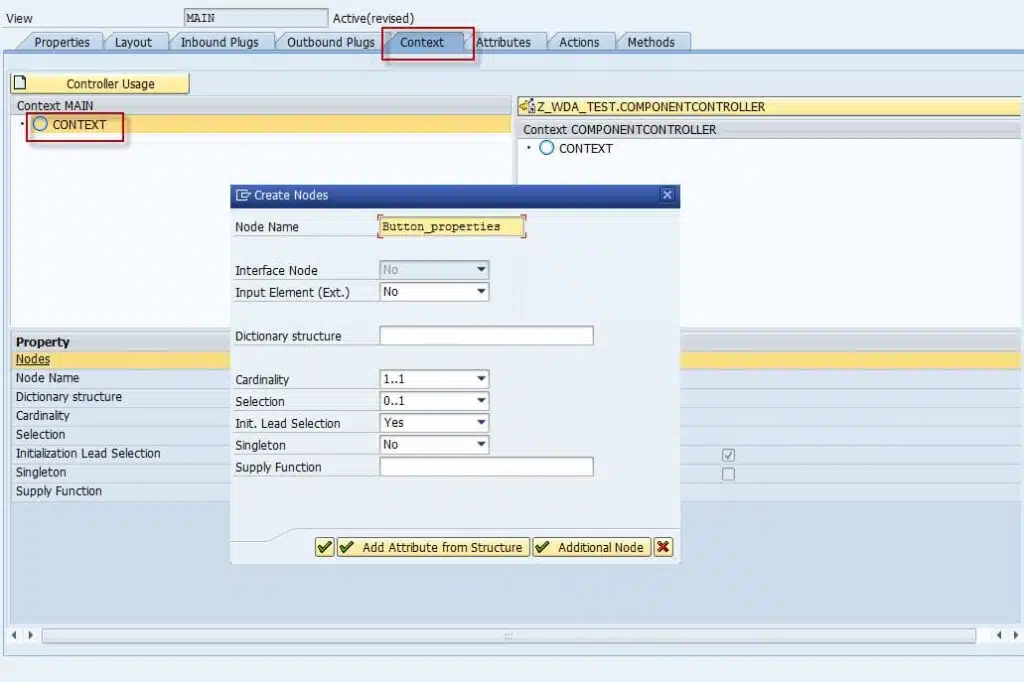
Right click on the BUTTON_PROPERTIES node and select ‘Create’ -> ‘Attribute.’
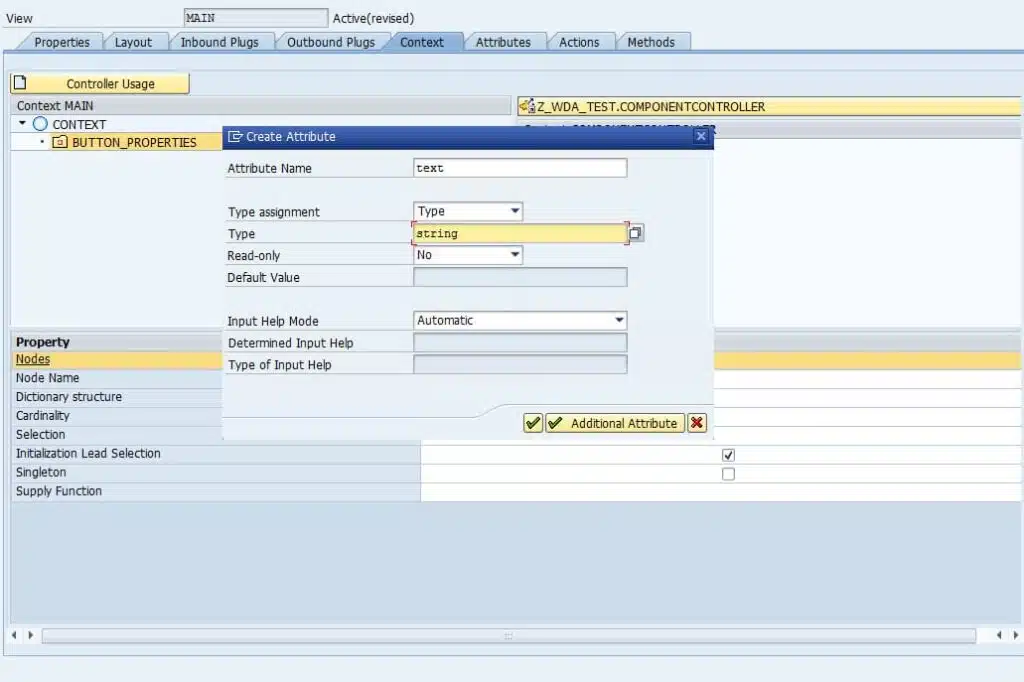
Now we have created an attribute in the context that will hold a string value. By the names I have given to the node and the attribute you can guess that this node will hold any attributes related to the button we created. The attribute that we created will be used to hold text value of the button.
Now that the context attribute has been created, let’s fill it with a value. Go back to the button properties under the ‘Layout’ tab and find the ‘onAction’ properties under ‘Events.’ Click the create button, it looks like a white piece of paper with the top right edge folded down, and fill in the fields as below.
Double click on the name of the new action we just created, SHOW_TEXT and this will take you to the methods tab. Here we are going to use the Web Dynpro Code Wizard to set the value of the attribute.
Click on the Web Dynpro Code Wizard icon (or Ctrl +F7), select ‘Read’, click and select the attribute that was created, TEXT. (Illustrated Below)
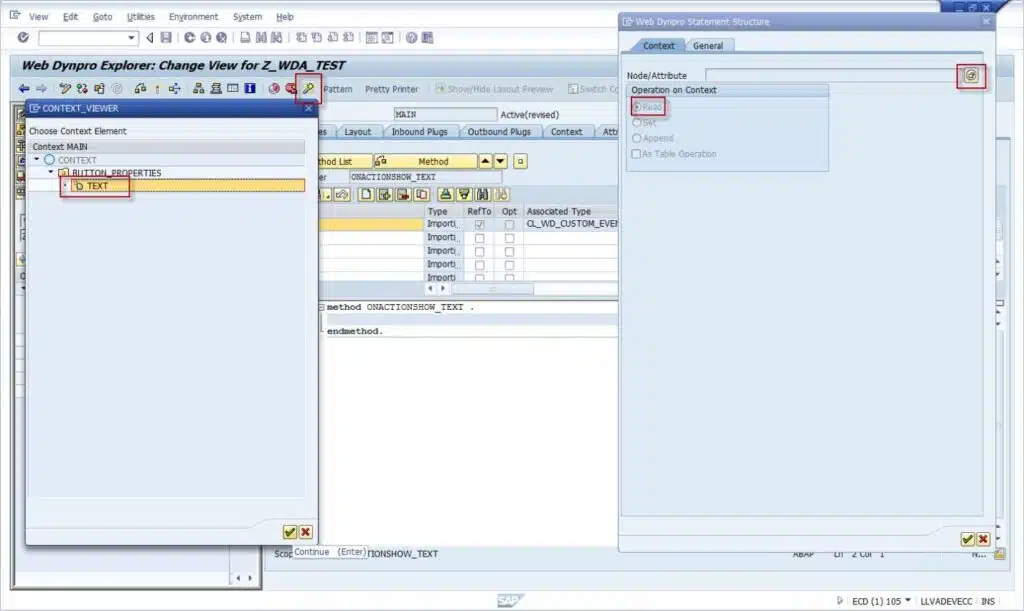
Now repeat the same steps starting with the Web Dynpro Code Wizard except this time select ‘Set’ instead of ‘Read.’ Each time the Web Dynpro Code Wizard is used DATA variables are created.
Note: If there are multiple attributes within a node, all of the attributes can be read or set at once by selecting the node.
After using the Web Dynpro Code Wizard the second time we now have two copies of the data variables that will not compile. Select the second set and delete them and in place put the following code:
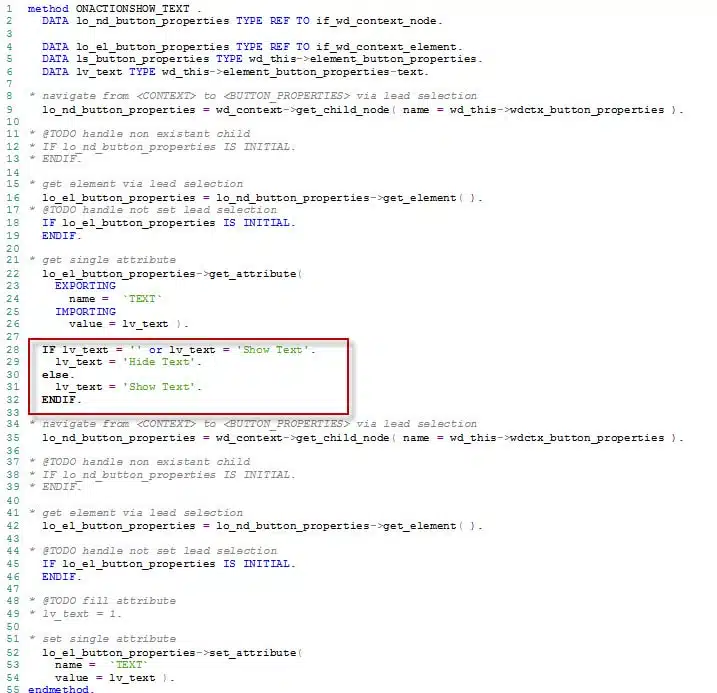
Now if the application was tested the value of the attribute TEXT would be changed between ‘Hide Text’ and ‘Show Text’ every time the button is pushed.
That is the rundown of how to build, read and set the context’s nodes and attributes. Now the context needs to be linked or ‘bound’ to the UI elements. Go back to the Layout tab and select the button. Under the properties find the ‘Text’ property. Click the yellow box to the right of the property and select the attribute to create the binding .
Binding
Binding is linking the data in the context to the UI elements. Here we have created an attribute that holds text. The ‘Text’ property of the button is set to the value within that property. Activate the Web Dynpro Component, create an application and test it.
For a little extra practice, add a TextView by dragging and dropping into the layout or right clicking on ROOTUIELEMENTCONTAINER and selecting ‘Insert Element.’ In the properties section set the Text value to ‘Now you see me!’ Create another node and attribute for the TextView by going to the ‘Context’ tab and right clicking on the ‘Context’ node and selecting ‘Create’ -> ‘Node’. Then create the attribute with the properties below.
Go to the ‘Methods’ tab and go into the method we was worked on earlier, ONACTIONSHOW_TEXT. Place the cursor after the ‘if’ statement that was put in, approximately line 33. Use the code wizard to set the new context we made. Then cut and pasted the DATA declarations just created and move them up to the top of the code. Then edit the ‘if’ statement to look like this:
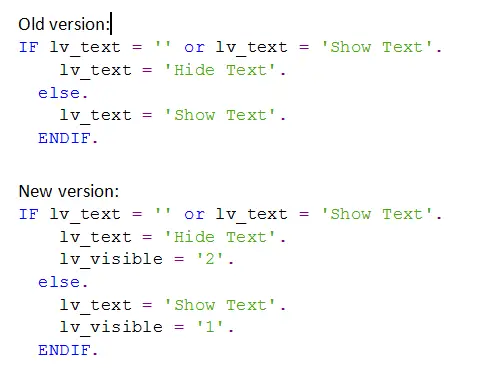
Return to the ‘Layout’ tab, select the TextView and set the ‘Visible’ property to the new attribute. Activate the Web Dynpro Component and test the application.


Hi Michael.
Excellent blog!!!!!
Super!!!
Thank you!
Thanks a lot!!